


How do You Plan a Building in AutoCAD?

posted 6th June 2024

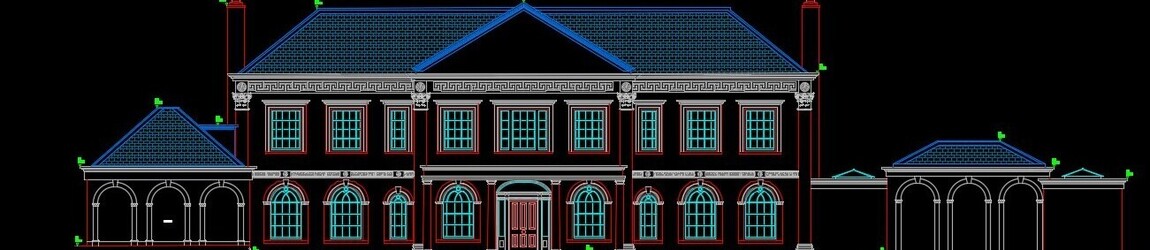
Detailed building plans are essential when it comes to any construction project. The external drawings, along with floor plans are carried out by architects that design and plan the building. The plans must be accurate and intricate, offering a visual aid for construction crews and new home owners.
AutoCAD holds just less than forty percent of the CAD market share. It was first released in 1982, and is being used by architects throughout the world to create accurate 2D floor plans. AutoCAD is known for its versatility and precision, with robust features, making it a good choice for designers, architects, and engineers.
How to do Plans in AutoCAD
Creating detailed and accurate plans in AutoCAD is a skill that architects and draughtsmen have mastered. It involves a number of steps, including preparation, creating interior and exterior walls, adding furniture, and more.
Preparation is Key
The first step is preparation. This involves installing the software, understanding the design requirements, and set-up up a drawing file. During the preparation stage, you choose whether you want to work in feet or metres, along with selecting a scale, and getting to understand the commands. The basic commands in AutoCAD includes:
- Arc – A
- Cancel Current Command - ESC
- Circle – CIRCLE
- Copy – CTRL + C
- Delete – DELETE
- Line – L
- Object snap – OS
- Offset – OFFSET
- Paste - CTRL + V
- Poly-line – PL
- Trim – TRIM
External Walls
The second step to drawing plans in AutoCAD requires using the command Line or Rectangle, drawing the external walls of the building. When drawing the external walls, pay close attention to the thickness of the walls you create, along with the overall dimensions, ensuring that they are to scale. This is important to ensure accuracy. You can do this by:
- Click New and Select Tutorial I-Arch template, this will start a new drawing
- Click on Paper in the status bar to change to model scape
- A drawing panel will pop up, click on rectangle to draw the exterior walls
- Choose Offset to specify how thick you want the walls
- Select Rectangle and specify the inside points
- Press Enter or Offset to exit
Interior Walls
Interior walls are done similar to the external walls, using Line or Poly-line commands. Interior walls tend to be thinner. Use the Offset tool to select the size of the interior walls. Ensure you pay close attention to where the interior walls join the exterior walls, ensuring the joints are accurate. This process is done as follows:
- Type MLINE and enter to start a double line
- Type W and enter your dimensions to set how wide you want the interior walls
- Choose your starting point
- To ensure accuracy use Nearest, Perpendicular, or Osnap Overrides
- Enter to exit the command
Add Windows and Furnishings
AutoCAD offers an extensive library of furniture, décor, and windows you can add to your plan, giving it a functional design. This helps to visualise the plans, while understanding the layout of the space.
Furniture items in the library can represent light fixtures, plants, furnishings, artworks, and more. You use the INSERT command to place the desired items where you want them. You can adjust them by using the commands MOVE, SCALE, or ROTATE.
You can add windows by using the draw line command or you can use the AutoCAD library. To draw windows, use the Line or Rectangle commend, or you can choose windows from the library section. Ensure you position them accurately within the walls.
Conclusion
AutoCAD offers numerous features and functions that help you plan a building, including 3D drawings. With so many features available, it's not possible to provide all of them in one blog. The ones listed above are the most basic functions needed to plan a building in AutoCAD.